HOW TO MAKE PEACH COBBLER CHEESECAKE CONES
These delicious Peach Cobbler Cheesecake Cones are a must-try for everyone who is seeking a scrumptious cone with a unique twist. There are a handful of mom-and-pop bakeries scattered around the country that provide something comparable to this, but they are expensive and can only be found in a limited few places.
Using this simple three-step technique, which we are going to guide you through today, you will be able to create your very own Peach Cobbler Cheesecake Cones at home. The greatest thing is that you can eat these delicious delights at any time of the year and on any occasion since they are so versatile and adaptable.
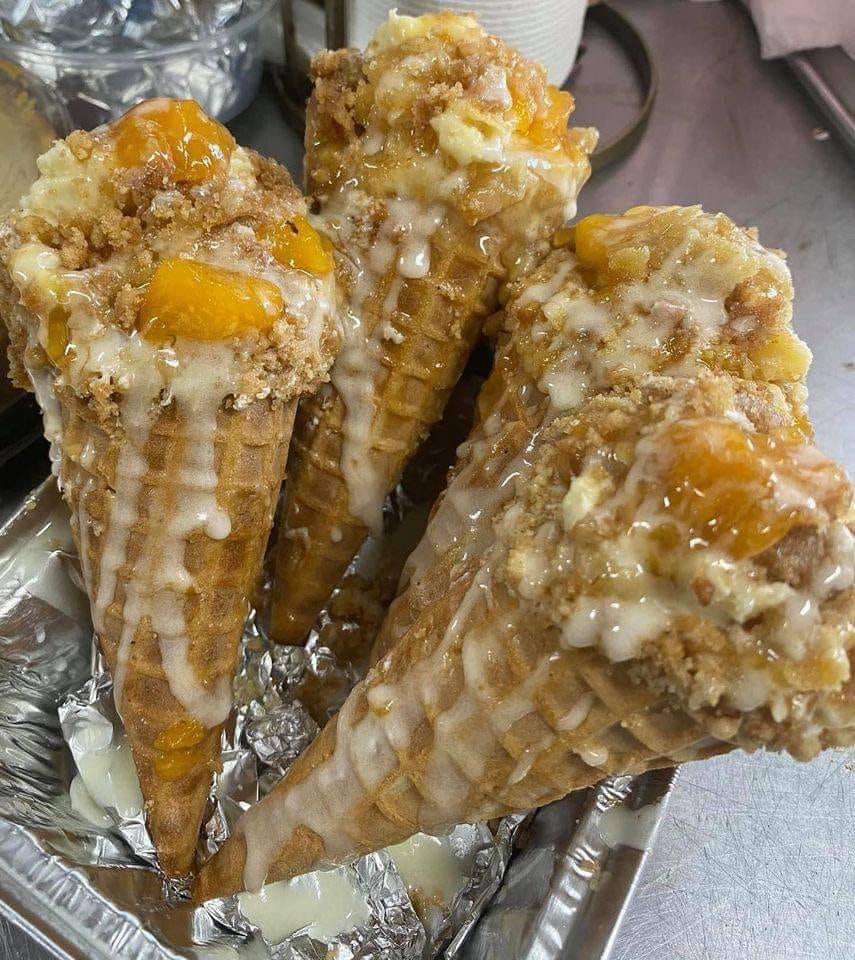
Waffle cones serve as the foundation for these Peach Cobbler Cheesecake Cones, which are then coated in white chocolate and sprinkled with white Oreo cookie crumbs. After that, the cones are stuffed with a delectable cheesecake filling that does not need baking and a freshly cooked peach cobbler. Everyone will want more of these amazing goodies, which are scrumptious and are sure to win them over.
The filling for these cones is a no-bake cheesecake that is produced using a technique that is deceptively simple despite its excellent flavor. You won’t be able to get enough of this filling because of how delicious it is.
INGREDIENTS NEEDED:
FOR THE CONE:
Waffle cones; I used 12 medium.
13-oz cream-filled vanilla cookies.
3 Tbsp.Of whipping cream.
FOR THE PEACH COBBLER:
50-oz.Of canned peaches.
A white cake mix box.
1 stick.Of salted butter.
1½ Tsp.Of cinnamon.
FOR THE CHEESECAKE FILLING:
1 Cup.Of heavy whipping cream.
16-oz.Of cream cheese.
1 Tsp.Of vanilla extract.
1 Cup.Of powdered sugar.
½ Tsp.Of lemon juice.
PREPARATION:
1st Step
Turn on the oven to 350 degrees Fahrenheit. So that your cones can dry well, you should get started on them right away.
2nd Step
Begin by pounding your vanilla cookies filled with cream in a food processor until fine. If you lack a food processor, you may put the cookies in a plastic bag that can be sealed.
3rd Step
Next, using your strength, smash them with a rolling pin. Continue to smash the cookies until they are at least the size of a pea or a little smaller. Add to a bowl.
4th Step
Put your white chocolate chips in a bowl that can go in the microwave and heat them for 30 seconds at a time while stirring. While stirring the melted chocolate, slowly pour in your whipped cream. Stir the chocolate with the cream until it is evenly distributed.
5th Step
You should start by dipping your cone into the melted chocolate, and then you should dip it into the crumbled cookies.
6th Step
Put upside down on a baking sheet to set the chocolate. If your chocolate is taking a long time to harden, you can put the cones in the fridge to speed up the process.
7th Step
Now you can start making your peach cobbler. Spray a 9×13-inch baking dish with cooking spray, then pour the peaches and their liquid from the can into the dish.
8th Step
If preferred, add cinnamon and whisk to mix. Then, evenly distribute your dry cake mix over the whole surface of the pan.
9th Step
Lastly, slice your butter stick into small slices. Spread the butter slices over the top of your cobbler. Bake in the oven for 45 to 60 minutes, or until the top is golden brown. Remove from the oven and cool.
10th Step
The last step is to make the cheesecake filling. Whisk the heavy cream on high until stiff peaks form, then put aside.
11th Step
Mix together cream cheese, powdered sugar, vanilla, and lemon juice in a separate bowl. To mix, whisk on medium-high speed. Carefully whisk whipped cream into the cream cheese mixture until incorporated.
12th Step
Now that all of the components have been prepared, it is time to assemble your delicious dessert! Fill your cone with scoops of cheesecake filling and peach cobbler, alternating until the cone is filled. Add a drizzle of melted white chocolate chips or crumbled biscuits on top. Serve right away and enjoy!